Available;
Память 16 GB, 2 GB RAM;
Батарея: Встроенный Li-Ion 2500 mAh аккумулятор;
Экран 5.0 дюймов, 68.9 cm2 , 720 x 1280 пикселей, 16:9 ratio ;
ОС, GPU: Android 6.0 , Mali-T720MP2;
Цвет: серебряный.
Основной процессор, графический, версия ОС
Операционная система: Android 6.0 (Marshmallow).
Чипсет: Mediatek MT6735P.
Процессор: Quad-core 1.0 GHz Cortex-A53.
Графический процессор: Mali-T720MP2.
Общие спецификации
GPS: есть, с A-GPS.
Беспроводные сети: Wi-Fi 802.11 b/g/n, Wi-Fi Direct, точка доступа.
Поддержка Bluetooth: 4.0, A2DP.
Характеристики USB: microUSB 2.0.
Радио: FM radio.
Инструкция для ZTE Blade V7 Lite скачать pdf
Инструкция по эксплуатации на русском языке для ZTE Blade V7 Lite . Файл можно скачать ниже - нажмите на кнопку "Загрузить инструкцию" и выберите пункт соответствующий вашей ОС, затем нажмите правой кнопкой мыши на нем и найдите в меню "сохранить ссылку как...". Посмотреть инструкцию можно в стандартном браузере или в программе Adobe Acrobat Reader. Скачать эту программу вы можете бесплатно на сайте Adobe.com. В современных мобильных устройствах программы для чтения PDF уже, как правило, установлены.
Стандарты связи
2G: GSM 850 / 900 / 1800 / 1900 - SIM 1 & SIM 2.
3G: HSDPA 850 / 900 / 2100 .
4G (LTE): LTE band 1(2100), 3(1800), 5(850), 7(2600), 8(900), 20(800), 40(2300).
Скорость передачи данных: HSPA, LTE Cat4 150/50 Mbps.
Браузер, датчики, мессенджеры
Датчики: Дактилоскопический отпечаток пальца (rear-mounted), акселерометр, бесконтактное считывание, компас.
Мессенджеры: - MP4/H.264 проигорователь
- Просмотр документов
- Фото/видео редактор.
Браузер: HTML5.
Дополнительно: - MP4/H.264 проигорователь
- MP3/WAV/eAAC+ проигорователь
- Просмотр документов
- Фото/видео редактор.
Нет NFC датчика (ближняя бесконтактная связь)
Основная и селфи камеры
Основная: 13 MP, autofocus, LED flash.
Фронтальная: 8 MP, LED вспышка.
Доп. возможности: Гео-тэги, фокусировка по прикосновению, определение лиц, HDR, режим панорамы.
Видео: 1080p@30fps.
Разрешение, покрытие экрана
Размер дисплея 5.0 дюймов, 68.9 cm2 (~68.3% отношение экрана к устройству). Разрешение - 720 x 1280 пикселей, 16:9 ratio (~294 ppi density). IPS LCD емкостный сенсорный экран, 16M цветов.
Мы подготовили подробную инструкцию по ZTE Blade V7 Lite хард ресет. Читайте далее, чтобы узнать все тонкости и детали этой операции.
Как известно, хард ресет (жесткий сброс) – это сброс настроек к заводским. Это означает, что если вы сделаете ZTE Blade V7 Lite хард ресет, тогда смартфон будет восстановлен к заводскому состоянию, конечно, с программной точки зрения. Никакие физические повреждения или царапины на экране он не может убрать, но снять графический ключ, удалить вирус, исправить ошибку – легко!
Но вы должны помнить, что сброс настроек ZTE Blade V7 Lite удаляет все личные данные с хранилища мобильного устройства. Вам следует сохранить все важные файлы, например, сообщения, контакты, фотографии и т.д., на другом устройстве или облаке.
Давайте начнем!
ZTE Blade V7 Lite хард ресет

Вот и все! После перезагрузки смартфон ZTE Blade V7 Lite будет работать как новый.
ZTE Blade V7 Lite сброс настроек
Также помните, что вы всегда можете выполнить сброс к заводским настройкам через меню настроек. Для этого перейдите в меню «Настройки» — «Резервное копирование и сброс» — «Сброс настроек ». Этот метод ничем не отличается от первого, за исключением того, что вы используете меню настроек, а не режим восстановления Android Recovery.
Транскрипт
1 ZTE BLADE V7 LITE Краткое руководство пользователя 1
2 1. Правовая информация Copyright 2016 Корпорация ZTE Все права защищены. Ни одна из частей настоящей публикации не может быть извлечена, воспроизведена, переведена или использована в какой-либо форме, электронной или механической, включая фотокопирование, без предварительного письменного разрешения Корпорации ZTE. Корпорация ZTE сохраняет за собой право внесения изменений в это руководство, относительно опечаток или доработок технических характеристик, без предварительного уведомления. Торговые марки Названия и логотипы ZTE являются зарегистрированными товарными знаками Корпорации ZTE. Google и Android являются товарными знаками корпорации Google, Inc. Товарный знак и логотип Bluetooth принадлежат корпорации SIG, Inc. Любое использование данного товарного знака Корпорацией ZTE лицензировано. Логотип является зарегистрированным товарным знаком компании SD-3C, LLC. Другие авторские права и товарные знаки являются собственностью их владельцев. Пожалуйста, посетите официальный сайт ZTE (для получения дополнительной информации по своей модели. Информация на сайте имеет приоритет. Примечание При установке приложения из сторонних источников, ваш телефон может перезагрузиться или приложение не сможет нормально функционировать. Это не ошибка и это может быть связано с несовместимостью приложения с вашим телефоном. Установка сторонней или неофициальной операционной системы может вызвать угрозу и риск безопасности. Корпорация ZTE не несет никакой ответственности за неполадки и повреждения, вызванные несанкционированными изменениями программного обеспечения. Назначение устройства Абонентская радиостанция(смартфон) ZTE BLADE V7 LITE предназначена для приема/передачи данных, приема/передачи голосовых сообщений, приема/передачи коротких сообщений, приема/передачи данных по сетям Wi-Fi и/или Bluetooth, доступа в сеть Интернет, и т.д. 2
3 Предустановленна операционная система Android. Содержание этого руководства, а так же изображения и снимки, использованные в этом руководстве, могут отличаться от реального устройства или программного обеспечения. Версия: R1.0 Руководство Дата изготовления: Изготовитель: Корпорация ЗТИ, КНР, г. Шэньчжэн, район Наньшань, Кейджи роад саут, Хай-тэк Индастриал Парк Импортер: ООО "Корпорация ЗТИ-Связьтехнологии", РФ, г. Москва, пр-т Андропова, д. 18, к. 5, этаж 20 3
4 2. Характеристики и параметры Модель ZTE BLADE V7 LITE ОС Android 6.0 Процессор Дисплей Камеры Память: Универсальный слот: Стандарты: Аккумуляторная батарея Поддержка карт памяти Размеры(мм): MT6735P 4-х ядерный 1.0 ГГц IPS 5.0" (1280x720), 16 млн. цветов Основная 13Мп+ Фронтальная 8Мп 16ГБ ПЗУ + 2ГБ ОЗУ nanosim (4FF) + nano SIM (4FF) GSM:850/900/1800/1900 UMTS: 850/900/2100 LTE FDD B1/3/5/7/8/20 TDD B40 Wi-Fi b/g/n; GPS; Bluetooth BT4.0 Li-ion 2500 ма ч microsd до 32 ГБ 143.8x70.2x8.2 Вес(г): 135 4


5 3. Внешний вид Разъем для наушников Вспышка Динамик Кнопка громкости Сенсорный экран Датчик приближения/ освещенности Камера Слот nano-sim/ microsdhc Кнопка питания Кнопка «Назад» Кнопка «Домой» Кнопка «Меню» Вспышка Камера Датчик разпознавания отпечатков пальцев Динамик Разъем micro-usb/ зарядки 5 Микрофон

6 4. Установка SIM карт и карты памяти ВНИМАНИЕ! Во избежание повреждения телефона, не используйте любые другие виды SIM-карт или любые нестандартные nano-sim-карты, вырезанные из SIM-карт. Вы можете получить стандартные nano-sim-карты у вашего оператора связи. Установка nano-sim карты и microsdhc карты Отключите телефон перед установкой или извлечением SIM карт или карты памяти microsdhc. 1. Вставьте приспособление для извлечения в специальное отверстие слота nano-sim карт, карты microsdhc. 2. Нажмите на кнопку и извлеките слот nano-sim карт, microsdhc карты. Затем установите SIM карты или microsdhc карту в соответствующий слот и вставьте его в телефон. 6
7 ПРИМЕЧАНИЕ: 4G LTE работает в обоих разъемах для nano-sim-карт, но не одновременно. Если один слот работает как 4G LTE, то другой слот может работать только как 2G. Nano SIM-карта (4FF) это уменьшенная версия SIM-карты. Размеры nano SIM-карты 12,3 8,8 мм. Функционал nano SIM-карт не отличается от функционала полноразмерных SIM-карт. Слот SIM-карты 2 также служит как слот для карты памяти. Однако, нельзя одновременно установить SIM-карту и карту памяти в слот Зарядка аккумуляторной батареи Аккумулятор телефона обычно имеет достаточный уровень заряда для включения, поиска сигнала, и совершения нескольких звонков. Необходимо полностью зарядить аккумулятор при первой возможности. ВНИМАНИЕ! Используйте только рекомендованные компанией ZTE зарядные устройства и кабели. Использование неутвержденных аксессуаров может стать причиной повреждения телефона или привести к взрыву батареи. ВНИМАНИЕ! Не заменяйте встроенный аккумулятор в телефоне самостоятельно. Батарея может быть заменена только в авторизованном сервисном центре ZTE. 1. Подключите зарядное устройство к разъему для зарядки. 2. Подключите зарядное устройство к электрической розетке. 3. Отключите зарядное устройство после того, как батарея полностью зарядится. 7
8 ПРИМЕЧАНИЕ: Если уровень заряда батареи является крайне низким, вы не сможете включить телефон, даже если он заряжается. В таком случае, попробуйте включить его еще раз после зарядки батареи в течение, по крайней мере, 20 минут. Обратитесь в сервисную службу, если вы не сможете включить телефон после длительной зарядки. ПРИМЕЧАНИЕ: Если экран замирает или слишком медленно реагирует на нажатия, попробуйте нажать и удерживать кнопку питания в течение примерно 10 секунд, чтобы перезагрузить телефон. 6. Правила и условия безопасной эксплуатации Не использовать устройство без гарнитуры в процессе вождения Не подносить к телу ближе, чем на 15 мм Мелкие детали устройства могут стать причиной удушья Устройство может являться источником громкого звука Чтобы избежать возможных проблем со слухом, не рекомендуется длительное прослушивание на высоком уровне громкости 8
9 Избегать контакта с магнитными носителями Не использовать людям с кардиостимуляторами и др. электронными устройствами жизнеобеспечения Выключать в больницах и иных медицинских учреждениях (при необходимости) Выключать в аэропортах и в самолетах (при необходимости) Выключать во взрывоопасной среде Не использовать в процессе заправки транспортных средств Устройство может излучать яркий или мигающий свет Не бросать в огонь Не подвергать воздействию экстремальных температур Избегать контактов с различными жидкостями, беречь от сырости Не разбирайте устройство Используйте только одобренные аксессуары Не полагайтесь на устройство, как на единственный способ вызова служб экстренной помощи Условия эксплуатации оборудования должны соответствовать местным и национальным электротехническим нормам. Основные параметры и характеристики, влияющие на безопасность Диапазон температур в рабочем состоянии: от -10 C до 40 C Диапазон относительной влажности воздуха в рабочем состоянии: от 60 до 90 %, без конденсации. 9


10 Информация о технике безопасности в отношении радиочастотного излучения: для обеспечения соответствия допустимого воздействия телефон должен использоваться на расстоянии минимум 15мм от тела. Несоблюдение этой инструкций может привести к превышению уровня радиочастотного излучения и не соблюдению необходимых норм. 7. Сенсорный экран Касание Если вы хотите ввести текст с экранной клавиатуры, выбрать элементы на экране, такие как значки приложений и настроек, или нажать экранные кнопки, просто коснитесь их пальцем. Нажмите и удерживайте Чтобы открыть доступные опции для элемента (например, сообщение или ссылка на веб-странице), нажмите и удерживайте элемент. Проведите пальцем или Сдвиньте Провести или сдвинуть значит быстро переместить палец вертикально или горизонтально по экрану. 10


11 Перетаскивание Чтобы перетащить, нажмите и удерживайте палец с некоторым давлением, прежде чем начать перемещать палец. Во время перетаскивания не отрывайте палец от экрана, пока вы не достигните нужного места. Изменение масштаба В некоторых приложениях (например, карты, браузер и галерея) вы можете увеличивать и уменьшать масштаб, поставив два пальца на экране сразу и сдвинуть их вместе (для уменьшения) или разведя их друг от друга (для увеличения) масштаба. Поворот экрана Для большинства приложений можно автоматически менять ориентацию экрана с книжной на альбомную, поворачивая телефон в сторону. 8. Удельный коэффициент поглощения (SAR) Ваше мобильное устройство является радиопередатчиком и радиоприемником. Данное устройство не превышает предельные уровни облучения в радиочастотном диапазоне, 11
12 рекомендованные международными стандартами. Эти руководящие принципы были разработаны независимой научно-исследовательской организацией ICNIRP и содержат допустимые границы безопасности, разработанные для обеспечения защиты всех лиц, независимо от возраста и состояния здоровья. В директивах используется единица измерения, называемая удельным коэффициентом поглощения SAR. Предел SAR, для мобильных устройств составляет 2 Вт/кг, а максимальное значение SAR для данного устройства при тестировании в области головы составляет Вт/кг, при тестировании в области тела составляет Вт/кг. Так как мобильные устройства предполагают широкий диапазон функций, они могут быть использованы в других положениях, например, как описано в руководстве. Так как коэффициент SAR измеряется на самой высокой мощности устройств, фактическое значение SAR для работающего устройства, как правило, ниже, чем указано выше. Это обусловлено автоматическим изменением уровня мощности устройства, для обеспечения использования минимального уровня мощности, достаточного для связи с сетью. Ограничения воздействия радиочастотных полей Для лиц, заботящихся об ограничении воздействия радиочастотных полей Всемирная Организация Здравоохранения (ВОЗ) дает следующий совет: Меры предосторожности: На сегодняшний день существующие научные исследования не указывают на необходимость каких-либо специальных мер предосторожности при пользовании мобильными телефонами. Для ограничения воздействия радиочастотного излучения на вас и ваших детей сократите время разговора и пользования телефоном, а также воспользуйтесь специальными устройствами "громкой" связи, позволяющими держать телефон на расстоянии от головы и тела. 12
13 Дополнительную информацию можно получить на домашней странице ВОЗ (бюллетень 193: июнь 2000 г.). 9. Декларация соответствия RoHsия RoHS Корпорация ZTE намерена сократить воздействия, оказываемые на окружающую среду и экологическую обстановку на планете. Таким образом данный документ позволяет ответственно заявить, что ZTE BLADE V7 LITE, произведенный Корпорацией ZTE, полностью соответствует директиве 2002/95/EC Европейского парламента - RoHS (Ограничение опасных веществ), по отношению ко всем следующим веществам: 1. Свинец (Pb) 2. Ртуть (Hg) 3. Кадмий (Cd) 4. Шестивалентный хром (Cr (VI)) 5. Полиброминированный бифенил (PBB) 6. Полиброминированные бифениловые эфиры (PBDE) Соблюдение этих требований засвидетельствовано письменной декларацией наших поставщиков. Это подтверждает, что любые потенциальные уровни загрязнения веществами, перечисленными выше, ниже максимального уровня, установленного в 2002/95/EC, или сведены к минимуму в связи с их применением. ZTE BLADE V7 LITE, производства ZTE CORPORATION, соответствует всем требованиям EU 2002/95/EC. 13

14 10. Правила и условия хранения, перевозки, реализации и утилизации Диапазон температур при хранении (в выключенном состоянии): от -10 C до 60 C. Диапазон относительной влажности воздуха(в выключенном состоянии): от 60 до 90 %, без конденсации. Устройство должно храниться в помещении в заводской упаковке. Транспортировка оборудования должна производиться в заводской упаковке в крытых транспортных средствах любым видом транспорта. Температура при перевозке: -10 C до 60 C; относительная влажность воздуха от 60 до 90 %, без конденсации. Правила и условия реализации устройства определяются условиями договоров, заключаемых компанией ZTE или авторизованными партнерами ZTE c покупателями устройства. Все электрические и электронные устройства должны утилизироваться отдельно от обычных бытовых отходов в специальных пунктах сбора, предусмотренных государством или местными властями, в соответствии с федеральными, региональными и местными законами, правилами и нормами. человека. Эта маркировка на изделии и принадлежностях указывает на то, что продукт соответствует Европейской директиве 2002/96/CE. Правильная утилизация поможет защитить окружающую среду и здоровье Для получения информации по переработке этого продукта, основанную на директиве WEEE, 14
15 пожалуйста, отправьте запрос по электронной почте на адрес 11. Информация о мерах, которые следует предпринять при обнаружении неисправности технического средства 1. Что делать если время работы аппарата не совпадает с временем работы, заявленным производителем? Смартфон это сложное электронное устройство, включающее в себя функции карманного компьютера и сотового телефона. Смартфон потребляет большое количество энергии для работы этих функций. Основное количество энергии тратится на работу дисплейного модуля и GSM приемо-передающего тракта. Яркость дисплея устанавливается автоматически на максимум при очень ярком освещении (солнечный день) или устанавливается пользователем в ручном режиме. Максимальная яркость потребляет максимум энергии. При работе GSM и при устойчивом и стабильном приеме аппарат потребляет минимальное количество энергии для поддержания связи. В случае неустойчивого и слабого сигнала сети аппарату требуется больше энергии для поддержания связи. В случае "Поиска Сети" в зоне отсутствия сети аппарат потребляет максимальное количество энергии, которое расходуется на поиск ближайших базовых станций. Для уменьшения потребляемой телефоном энергии требуется: 1) Отключить GPS, если эта функция не требуется в данный момент. 2) Отключить мобильный интернет, если эта функция не требуется в данный момент 3) Отключить или удалить лишние неиспользуемые приложения, т.к. они потребляют внутренние ресурсы аппарата. 2. Что нужно делать если телефон завис, не включается или перезагружается? Причиной перезагрузки или зависания в большинстве случаев является стороннее программное обеспечение или программы. 15
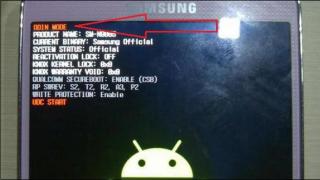
16 1) Первоначально мы рекомендуем вам восстановить стандартные заводские настройки (предварительно сохранив нужную вам информацию). Если телефон включается, выберите функцию "сброс к заводским настройкам" в меню устройства. В случае, если аппарат не включается, включите аппарат в "Recovery mode" и выберите пункт "wipe data/factory reset". Способ включения в "Recovery mode" описан ниже в пункте "Как войти в Recovery mode?". 2) Если сброс к заводским настройкам не помогает, обновите программное обеспечение. Способы обновления программного обеспечения описаны в пункте "Как обновить программное обеспечение?". 3) Если обновление программного обеспечения не помогло, обратитесь в ближайший Авторизованный Сервисный Центр ZTE. 3. Как обновить программное обеспечение? Мы предоставляем вам разные способы обновления программного обеспечения, а именно: обновление с помощью карты памяти или обновление "по воздуху". Для обновления "по воздуху" нужно выполнить подключение к сети интернет по беспроводной сети Wi-Fi или с помощью GSM соединения и проверить наличие обновлений в настройках. 4. Что делать если вы забыли пароль или графический ключ для разблокировки экрана? Если вы забыли графический ключ или цифровой пароль для разблокировки экрана, требуется провести процедуру сброса к заводским настройкам: 1) Включите аппарат в "Recovery mode" и выберите пункт "wipe data/factory reset". 2) Если процедура не выполняется, требуется обратиться в Авторизованный Сервисный Центр ZTE. 5. Как зайти в Recovery mode? В выключенном состоянии зажмите одновременно кнопку громкости (увеличить+) и кнопку включения. По всем остальным вопросам обратитесь в службу поддержки корпорации ZTE или в авторизованный сервисный центр корпорации ZTE. Телефон службы поддержки, адреса авторизованных сервисных центров, а также дополнительную 16
17 информацию можно найти на сайте: Представительство производителя в РФ: Московское представительство Корпорации ЗТИ (г. Москва, пр-т Андропова, д.18, корп.5, 20 этаж) 12. Аккумуляторная батарея Тип Емкость Номинальное напряжение Максимальное напряжение Модель Производитель Дата производства Страна производства Литий-ионный полимерный аккумулятор 2500 м Ач(9.5 В ч) 3.8 В 4.35 В Li3825T43P3h ZTE CORPORATION указана на устройстве КНР 13. Зарядное устройство Тип Марка/модель Вход Выход Производитель Дата производства Страна производства Адаптер питания ZTE/LPL-A A ~ В 50/60Гц 200мА Макс. =5В 1000мА ZTE CORPORATION указана на устройстве КНР Основные параметры и характеристики, влияющие на безопасность (см. пункт 6) Назначение устройства Адаптер питания это устройство, предназначенное для преобразования электрической энергии, поступающей из 17
18 сети переменного тока. Правила и условия безопасной эксплуатации (см. пункт 6) Правила и условия хранения, перевозки, реализации и утилизации (см. пункт 10) Информация о мерах, которые следует предпринять при обнаружении неисправности технического средства (см. пункт 11) Изготовитель: Корпорация ЗТИ, КНР, Шэньчжэн, район Наньшань, Хай-тэк Индастриал Парк Импортер: ООО "Корпорация ЗТИ-Связьтехнологии", РФ, г. Москва, пр-т Андропова, д. 18, к. 5, этаж 20 18
1. Характеристики и параметры Модель ZTE Blade X3 ОС Android 5.1 Процессор Стандарты Поддержка SIM-карт Дисплей Камера основная Камера фронтальная Встроенная память (ПЗУ) Оперативная память (ОЗУ) MT6735P,
ZTE BLADE V7 Краткое руководство 1. ПРАВОВАЯ ИНФОРМАЦИЯ Copyright 2016 Корпорация ZTE. Все права защищены. Ни одна из частей настоящей публикации не может быть извлечена, воспроизведена, переведена или
ZTE BLADE A910 Краткое руководство Оглавление 1. Правовая информация... 2 2. Внешний вид... 4 3. Установка nano-sim карт и карты памяти microsdhc... 5 4. Зарядка аккумулятора... 6 5. Управление устройством...
ZTE BLADE L110 Краткое руководство пользователя Содержание 1. Комплектация... 2 2. Правовая информация... 3 3. Внешний вид... 5 4. Установка microsim-карт и карты памяти microsdhc... 6 5. Зарядка аккумулятора...
Смартфон ZTE Blade Q Lux Краткое руководство пользователя 1 ПРАВОВАЯ ИНФОРМАЦИЯ Copyright 2015 Корпорация ZTE Все права защищены. Ни одна из частей настоящей публикации не может быть извлечена, воспроизведена,
ZTE BLADE GF3 Краткое руководство пользователя Содержание 1. Комплектация... 2 2. Правовая информация... 3 3. Внешний вид... 5 4. Установка microsim-карт и карты памяти microsdhc... 6 5. Зарядка аккумулятора...
ZTE BLADE A610 Краткое руководство пользователя Содержание 1. Комплектация... 2 2. Правовая информация... 3 3. Внешний вид... 5 4. Установка microsim-карт и карты памяти microsdhc... 6 5. Зарядка аккумулятора...
Nubia Z11(NX531J) Краткое руководство пользователя Оглавление Правовая информация... 2 Внешний вид... 5 Установка SIM карт и карты памяти microsdhc... 6 Зарядка аккумулятора... 8 Управление устройством...
ZTE Geek Краткая инструкция пользователя 1 ЮРИДИЧЕСКАЯ ИНФОРМАЦИЯ Копирайт 2013 Корпорация ZTE. Все права защищены. Ни одна из частей настоящей публикации не может быть извлечена, воспроизведена, переведена
Знакомство с телефоном Русский Благодарим за выбор смартфона Huawei! Перед началом работы ознакомьтесь с основными функциями Вашего нового устройства. Нажмите и удерживайте кнопку питания, чтобы включить
Русский Дополнительная информация Благодарим за выбор абонентского терминала HUAWEI P8 lite модели ALE-L21 (далее по тексту "Устройство")! Прочтите краткое руководство пользователя, входящее в комплект
USB-модем (Абонентский терминал) Руководство пользователя ZTE MF823D 1 Содержание 1. Правовая информация...4 2. Комплектация...7 3. Характеристики и параметры...7 4. Минимальные системные требования...9
ZTE-Roamer Краткое руководство пользователя Информация по безопасности изделия Дополнительная информация приведена в Руководстве пользователя, имеющемся на предустановленной карте памяти microsd. Прочтите
GS202 Телефон В этом разделе Вы ознакомитесь с аппаратными элементами устройства. 4 5 6 1 2 7 3 8 9 10 11 Элемент Описание 1 Разъем для наушников 2 Кнопка питания 3 Порт Micro-USB 4 Передний объектив Используйте
G1342 2QM02-00004-200S Телефон В этом разделе Вы ознакомитесь с аппаратными элементами устройства. 5 6 3 1 12 4 2 10 7 8 9 11 Элемент Описание 1 Разъем для Используйте гарнитуру для громкой наушников связи
Руководство пользователя ZC554KL R12503 15060-95606000 Первое издание/апрель 2017 Модель: ASUS_X00ID (ZC554KL) Для предотвращения опасности получения травмы или повреждения устройства перед началом эксплуатации
Содержание Меры предосторожности. 2-3 Основные сведения о планшете. 4-7 Основные операции. 7-10 Включение и выключение. Режим ожидания. 7 Подключение к ПК. 8 Установка карты памяти. 9 Навигация GPS. 9
Содержание Меры предосторожности. 2-3 Основные сведения о планшете. 4-7 Основные операции. 8-11 Включение и выключение. Режим ожидания. 8 Подключение к ПК и телевизору. 8-10 Установка карты памяти. 10
Содержание Меры предосторожности. 2-3 Основные сведения о планшете. 4-6 Основные операции. 7 Включение и выключение. Режим ожидания. 7 Подключение к ПК. 7 Установка карты памяти. 8 Возможные неполадки
3G Wi-Fi роутер ZTE MF65M Краткое руководство пользователя 1 Оглавление 1. Правовая информация...2 2. Комплектация...4 3. Характеристики и параметры...4 4. Знакомство с устройством...6 5. Подготовка к
Redmi 5A кнопка «Громкость» кнопка «Питание» Кнопка Меню Кнопка Назад Кнопка Домой разъем USB Основная информация по вопросам безопасности Перед использованием устройства, ознакомьтесь с информацией по
Quick Start Guide Знакомство с телефоном Благодарим за выбор абонентского терминала HUAWEI honor 4X модели Che2-L11 (далее по тексту "Устройство")! Перед началом работы ознакомьтесь с основными функциями
Уважаемый покупатель! Благодарим Вас за покупку планшетного компьютера RoverPad. Перед началом эксплуатации устройства внимательно ознакомьтесь с данным Руководством. Дополнительное руководство пользователя
2014 myphone. All rights reserved. myphone CUBE RU Руководство по эксплуатации Техническая спецификация: RAM Memory/ Оперативная память: 1GB 16ГБ встроенной памяти 1800mAh аккумулятор Параметры зарядного
1 2013 Все права защищены Acer Liquid S2 Краткое руководство Модель: S520 Эта редакция: 09/2013 Информация о продукте Подробные сведения о продукте см. на веб-сайте www.acer.com. Чтобы узнать сведения
Руководство пользователя 2 Правовая информация Google Inc., 2011. Все права защищены. Google, стилизованный логотип Google, Android, стилизованный логотип Android, Nexus, стилизованный логотип Nexus, Nexus
Портативное зарядное устройство AP007 Руководство пользователя Знакомство с портативным зарядным устройством AP007 Портативное зарядное устройство AP007 (далее по тексту «Зарядное устройство AP007») это
Знакомство с телефоном Русский Благодарим Вас за выбор абонентского терминала HUAWEI Y5c модели HUAWEI Y541-U02 (далее по тексту "Телефон"). Сначала ознакомьтесь с базовой информацией. Нажмите и удерживайте
YOGA TABLET 8 / YOGA TABLET 10 Краткое руководство пользователя версии 1.0 Внимательно прочитайте это руководство перед использованием устройства YOGA TABLET. Вся информация, помеченная звездочкой (*)
Tablet PC Внимание: Внешний вид и кнопки: Этот документ содержит информацию о важных мерах безопасности и правильном использовании продукте. Для того чтобы избежать несчастных случаев и поломки, пожалуйста,
РУКОВОДСТВО ПО ЭКСПЛУАТАЦИИ Смарт очки с Bluetooth-гарнитурой HB-600 Благодарим Вас за выбор продукции Harper. Перед началом использования ознакомьтесь с инструкцией по эксплуатации и сохраните ее на случай
Беспроводной роутер (точка доступа) ZTE MF920 Руководство пользователя 1 Содержание 1. Правовая информация... 3 2. Комплектация... 6 3. Характеристики и параметры... 7 4. Информация о батарее... 8 5. Минимальные
Прочтите перед использованием Пожалуйста, в целях правильного и безопасного использования устройства, прежде чем приступать к работе с ним, изучите руководство. Внешний вид устройства может отличаться
Lenovo K900 Краткое руководство пользователя версии 1.0 Для ПО Android 4.2. Внимательно прочитайте это руководство перед использованием телефона. Общий вид 1 2 9 6 8 3 10 11 4 12 5 6 7 1 Фронтальная камера
MOBILE INTERNET DEVICE idx9 3G 3G КРАТКОЕ РУКОВОДСТВО ПОЛЬЗОВАТЕЛЯ Благодарим Вас за выбор продукции Digma. Прежде чем начать использование данного устройства, пожалуйста, внимательно прочтите руководство
Роутер Yota Руководство пользователя Комплектация 1. Роутер Yota 2. USB-кабель Если в комплекте поставки отсутствуют вышеперечисленные элементы или вы видите, что какой-либо из элементов поврежден, пожалуйста,
2014 myphone. All rights reserved. myphone S-Line 16GB ENG Руководство по эксплуатации Техническая спецификация: RAM Memory/ Оперативная память: 1GB 16ГБ встроенной памяти 1800mAh аккумулятор Параметры
Содержание Основные сведения о Tesla............ 2 Общий вид..................... 2 Адаптер питания....5 Основные приемы работы с Tesla......... 7 Включение Tesla.................. 7 Выключение Tesla.................
MOBILE INTERNET DEVICE idx10 3G КРАТКОЕ РУКОВОДСТВО ПОЛЬЗОВАТЕЛЯ 3G Благодарим Вас за выбор продукции Digma. Прежде чем начать использование данного устройства, пожалуйста, внимательно прочтите руководство
HB-203 Bluetooth стерео наушники с микрофоном Руководство по эксплуатации Благодарим Вас за выбор продукции Harper. Перед началом использования ознакомьтесь с инструкцией по эксплуатации и сохраните ее
Перед использованием компьютера ознакомьтесь с указаниями по технике безопасности и важными советами в прилагаемых руководствах. Примечания Перед использованием изделия обязательно прочитайте руководство
РУКОВОДСТВО ПО ЭКСПЛУАТАЦИИ Bluetooth стерео наушники с микрофоном HB-101 Благодарим Вас за выбор продукции Harper. Перед началом использования ознакомьтесь с инструкцией по эксплуатации и сохраните ее
Краткое руководство пользователя FTTB EXPERT Innbox E70 Оглавление Меры предосторожности... 4 Введение... 5 Светодиодные индикаторы... 6 Задняя панель... 7 Подключение Innbox E70 к электросети... 8 Подключение
РУКОВОДСТВО ПО ЭКСПЛУАТАЦИИ Bluetooth стерео наушники с микрофоном HB-309 Благодарим Вас за выбор продукции Harper. Перед началом использования ознакомьтесь с инструкцией по эксплуатации и сохраните ее
Содержание Содержимое упаковки... 114 Начало работы... 115 Описание устройства... 116 Мастер настройки... 117 Подключение к сети Wi-Fi... 118 A interface Android TM... 120 ARCHOS Fusion Storage... 124
РУКОВОДСТВО ПОЛЬЗОВАТЕЛЯ Lunas.TV-1 FTV1S00101 lunas.tv RU ЗНАКОМСТВО С УСТРОЙСТВОМ Благодарим за выбор портативного мобильного приемника цифрового эфирного телевидения Lunas.TV-1 (далее по тексту «Устройство»)!
Quick Start Guide Краткое руководство пользователя Короткий посібник користувача Русский Знакомство с устройством Благодарим за выбор смартфона HUAWEI nova lite 2017! Перед началом работы ознакомьтесь
Планшеты ARCHOS: ARCHOS 70 Neon Plus ARCHOS 70 Platinum ARCHOS 101c Platinum ARCHOS 101 Magnus ARCHOS 101 Magnus Plus ARCHOS 70c Xenon ARCHOS 80c Xenon ARCHOS 101b Xenon ARCHOS 70b Helium Руководство пользователя
РУКОВОДСТВО ПО ЭКСПЛУАТАЦИИ Шапка со встроенной Bluetooth гарнитурой HB-505 Благодарим Вас за выбор продукции Harper. Перед началом использования ознакомьтесь с инструкцией по эксплуатации и сохраните
Quick Start Guide Краткое руководство пользователя Короткий посібник Дополнительная информация Русский На веб-сайте http://consumer.huawei.com/en/ можно загрузить руководство пользователя для Вашего устройства,
Экшн-камера MiJia Action Camera Инструкция пользователя Перед использованием устройства тщательно ознакомьтесь с руководством пользователя и сохраните его должным образом. 1. Комплектация Камера 1 Аккумулятор
Содержание Основные сведения о планшете............... 2 Общий вид........................... 2 Адаптер питания.... 5 Основные приемы работы с планшетом.......... 6 Включение планшета.....................
Содержание Основные сведения о Tesla............ 2 Общий вид..................... 2 Адаптер питания...5 Основные приемы работы с Tesla......... 6 Включение Tesla.................. 6 Выключение Tesla.................
Содержание Основные сведения о планшете............... 2 Общий вид........................... 2 Адаптер питания.... 5 Основные приемы работы с планшетом.......... 6 Включение планшета.....................
РУКОВОДСТВО ПОЛЬЗОВАТЕЛЯ EVE 8800 3G ES8031EG Благодарим Вас за выбор продукции Digma! Перед началом использования данного устройства, пожалуйста, внимательно прочтите руководство для обеспечения правильной
Информация о предостережениях ОСТОРОЖНО: ОСТОРОЖНО указывает на потенциальную опасность серьезного материального ущерба, получения травм или летального исхода. Dell Latitude E4200 Сведения по настройке
ИНСТРУКЦИЯ ПОЛЬЗОВАТЕЛЯ myphone FUN5 (смартфон) Благодарим Вас за выбор компании MyPhone. Данное руководство предназначено для ознакомления пользователя с работой устройства. Полную версию можно скачать
Знакомство с устройством Доступ в Интернет по сети 4G+, 3G или 2G Беспроводной роутер предоставляет доступ в Интернет по сети Вашего оператора (4G+, 3G или 2G). 1 Доступ в Интернет по сети Wi-Fi сторонней
РУКОВОДСТВО ПОЛЬЗОВАТЕЛЯ НОУТБУК EVE 1400 ET1106EW Благодарим Вас за выбор продукции Digma! Перед началом использования данного устройства, пожалуйста, внимательно прочтите руководство для обеспечения
Беспроводная Bluetooth акустика HIPER Sound Go Краткое руководство пользователя Поздравляем Вас с покупкой беспроводной Bluetooth акустики HIPER Sound Go. Беспроводная акустика HIPER это высоко-технологичный
Портативная Wi-Fi камера Zodikam 507 Краткое руководство по эксплуатации Зодиак беспроводные решения 2015 1. Внешний вид устройства Клавиша перезагрузки Карта micro SD Порт micro USB При долгом нажатии
Начните с этого Краткое руководство 1 2 3 Micro SD 4 5 WLAN 6 7 8 9 (2) - Micro USB Расположение серийного номера, номера продукта и номера модели Серийный номер и номер продукта указаны на левом крае
Планшетный компьютер IRBIS TX07 Инструкция по эксплуатации Планшетный компьютер IRBIS TX07 Инструкция по эксплуатации Уважаемый пользователь! Поздравляем Вас с покупкой и благодарим за выбор продукции
1. Комплект поставки 1. 2. Блок питания 3. Чехол 4. USB кабель 5. 6. Гарантийный талон 7. Уведомление о гарантиях и обязательствах 2. Обзор устройства 15 16 3 4 5 6 1 2 13 14 10 9 8 11 12 7 RU - 1 1 2
РУКОВОДСТВО ПОЛЬЗОВАТЕЛЯ EVE 1800 3G ES1035EG Благодарим Вас за выбор продукции Digma! Перед началом использования данного устройства, пожалуйста, внимательно прочтите руководство для обеспечения правильной
Приветствую всех заглянувших!
Думаю, даже и говорить не стоит о том, какое значение имеет в наше время мобильный телефон. Это уже настоящая необходимость, без которой, как без рук, очень сложно обойтись. И здесь идет речь о телефоне не только как о средстве связи, а о тех всех функциях и возможностях, которые заключены в одно небольшое, но функциональное слово - смартфон.
Общая информация:
Цена: 7 990 руб. , но меняется в зависимости от магазина.
Место покупки: магазин Техно Сила г. Омск.
Сделано в Китае.
Упаковка:
Стандартная - коробка из плотного картона с логотипом марки и модели телефона.


Комплектация:
Здесь же подробно расскажу о каждом комплектующем более подробно.


Очень скромная книжечка-гармошка с очень скромным содержанием о телефоне, поэтому здесь как нигде очень хорошо помогает "Метод тыка".

Достаточно удобный формат, так как нет необходимости в поиске кабеля для подключения телефона к компьютеру - все в одном комплекте, и кабель и зарядка.
Единственный момент, кабель-USB немного коротковат.

Да-да, просто так симку или карту памяти не достать, для этих целей в комплекте идет вот такой маленький и скромный ключик.
Первый раз я поторопилась и без прочтения инструкции сразу полезла открывать слот, или точнее отгибать... А надо то было всего лишь надавить и открыть.


В магазине мне сказали, что гарнитура в комплект к этой модели не входит, но ошиблись - идет и еще какая - не простые наушники, а капельки. Отличная вещь, скажу я вам! А какой чистый звук и качество... В общем, я очень довольна.
Ну и самый важный предмет в этой коробке - смартфон ZTE Blade V7 lite.

Это была моя любовь с первого взгляда и с первого прикосновения...
Вот он мой красивый в металлическом серебристом корпусе...
Из легкого и прочного авиационного алюминия.
Внешние характеристики:
Размер телефона (реальные замеры):
14,3 см. х 7 см. х 0,6 см.

По сравнению с моим старым смартфоном , конечно разница была ощутимой, но привыкала я не долго. Телефон лежит в руке очень удобно и аккуратно, но в карманах для него места мало.
Внешний вид:
Для наглядности прилагаю схему из инструкции к телефону и покажу на самом смартфоне.

✸ С лицевой стороны ZTE Blade V7 lite находятся:
- Камера (фронтальная ) к ней я чуть позже еще вернусь;

- Вспышка (светодиодная);
- Динамик.
Работает отлично пока без нареканий. Звук не искажает, не шипит и не трещит;
- Датчик приближения/освещенности
Визуально его не видно, только при хорошем освещении заметна небольшая черная точка. Очень удобная штука, особенно если установить автоматическую настройку яркости дисплея, которая в зависимости от освещенности добавляется или убавляется.
- Световой индикатор.
В инструкции почему-то такого нет, но на деле он имеется.
Что показывает : оповещает о пропущенных вызовах, приходящих сообщениях, отсутствии связи или напоминает о низком заряде батареи.
В зависимости от событий и задач может быть зеленого или красного цвета.

Кстати,
Если батарея заряжена, нет сообщений и со связью все в норме, но индикатор мерцает красным, то это может говорить о неполадках в самом телефоне!
У меня пока такого не было, но надеюсь и не будет.
Это была верхняя часть телефона, теперь перехожу к нижней:
✸ Здесь имеется три функциональных кнопки:

- Середина
Кнопка "Домой".
Всегда видна в виде синего круга даже в неактивном состоянии телефона.
- Кнопка справа - Меню;
- Кнопка слева - Назад.
Для меня такое расположение было неудобным, поэтому в Настройках назначение кнопок поменяла местами.
Это была лицевая сторона телефона, теперь быстро пробегусь по боковым функциональным кнопкам:
✸ Правая сторона:

- Слот для SIM-карты и/или карты памяти.
Дело в том, что данная модель телефона имеет "гибридный" слот, т. е. я могу поставить либо две сим-карты, либо одну симку и карту памяти. Согласна, это неудобно, но спасает то, что в телефоне 16 Гб внутренней памяти и пока нет необходимости в дополнительном накопителе.
Кстати, данный телефон работает с картой в формате:

- Кнопка питания:
Позволяет разблокировать/заблокировать телефон, а также включить/выключить/перезагрузить.
✸ Левая сторона:

- Кнопка громкости:
По моим ощущениям - все кнопки именно там где надо, работают исправно и не заедают. Кстати, выполнены они также из металла.
✸ Соответственно сверху и снизу телефона имеются разъемы:
- Для на ушников;

- Для подключения кабеля или зарядного устройства;
- Микрофон.

Близкие вроде не жалуются, говорят что слышно меня хорошо и звук не искажается.
Т еперь посмотрим, что находится у моего ZTE Blade V7 lite на задней панели.

- Камера (основная) , также расскажу о ней чуть позже.
- Вспышка (светодиодная):

Которая по совместительству является еще и очень ярким фонариком.
- Датчик распознавания отпечатков пальцев;
Для кого-то, возможно, очень важный атрибут, но у меня в нем особой необходимости нет. Для разблокировки достаточно "кнопки питания", а скрывать фото и видео мне не от кого. Хотя, настроить эту функцию я пыталась, но после долгих замудренных процессов передумала.
- Динамик:
В том то и дело, что "динамиК", а не "динамиКИ"! Не смотря на то, что их два, только один издает звук. Видимо второй для симметрии, так как телефон полностью исправен.
Звук хороший, чистый, без шипения и хрипов, но на полную громкость я его совсем не включаю, для этого у меня есть гарнитура...
Заводскую наклейку снимать не стала, только переклеила гарантийную наклейку в талон. Все равно ее не видно под чехлом.


Ну все, с внешними характеристиками закончили, теперь перехожу
к характеристикам самого телефона ZTE Blade V7 lite .
Здесь также приведу фото из инструкции и о некоторых моментах более подробно расскажу, но только как со стороны обычного пользователя... в юбке.

Операционная система:
Мой прошлый телефон был на Android 4.2 - разница очень заметная и в плане функциональности и в плане внешнего представления.
Конечно, более новой версией я довольна больше. Мне очень нравится, что здесь уже как такого меню нет, все приложения выведены на экраны телефона. По значимости и необходимости что-то можно перекинуть на главный экран, а что-то распихать по папкам.


Также радует эта версия и в целом в работе, хотя этот критерий зависит также и от внутренних возможностей телефона. Единственный минус почти за год эксплуатации, это с некоторыми приложениями из Play Маркет может возникнуть "конфликт", как например получилось у меня с "Черным списком": здесь Android 6.0 предлагает для обмена СМС использовать либо основное приложение, либо приложение "Черный список". При выборе первого - не блокируется СМС - спам, при выборе второго - не о всех сообщениях приходят оповещения. В общем, надо поискать что-то более эффективное, но не такое глючное для блокировки левых звонков и СМС-спама.
Дисплей:
5 ", (1280 х 720), 16 млн. цветов.
Для меня этот дисплей просто красавчик во всех отношениях. Яркий, с четкой картинкой для визуального восприятия. Не полосит, не фонит, не рябит и не мерцает (говорю только о видимых человеческому глазу показателях).
Память:
16 Гб внутренней памяти и 2 Гб оперативной.
Кому-кому, а мне внутренней памяти хватает за глаза.
Что же касается оперативной, то с точки зрения моего понимания, тоже все отлично - телефон не тормозит и не глючит, особенно это касается игр и приложений.

Аккумуляторная батарея:
Литиевая, емкость 2500 мА, несъемная.
Начну со своего главного опасения и страха за работу телефона ZTE Blade V7 lite - это несъемный тип батареи. А все потому, что любой глюк в мобильных телефонах легко решался с помощью вынутой батареи. А что делать, если этого сделать нельзя!? Ну вот такие вот впечатления у меня сложились после Леново...

В общем, в магазине меня успокоили, что виснут телефоны этой марки крайне редко, поэтому могу не переживать.
Что же касается емкости , то 2500 мА для такого смартфона это мало. Я не заядлый болтун и не интернет-юзатель, который сутками не выпускает смартфон из своих рук. За день могу несколько раз перекинуться парой фраз с мужем и с дочкой или полистать новости в группах ВК - ВСЁ, батарея села, а это я даже не считаю разговоры с мамой по 60 мин. раз в три дня.
Не спорю, установленные приложения на телефоне типа погоды, шагомера или периодические обновления тоже нехило кушают батарею, но день - все равно это как-то мало.
Камера:
Фронтальная - 8 Мп.
Это именно то из-за чего мне очень хотелось купить себе новый телефон. Не знаю, зачем не нужна была фронтальная камера, но нужна была очень... А если учесть, что по качеству она была лучше в три раза чем основная камера на моем старом телефоне, так и вообще я полюбила ZTE Blade V7 lite еще сильнее.
Вот честно, сравнивать мне не с чем, поэтому в целом качеством снимков я довольна. Особенно, если еще загрузить какое-нибудь приложение, которое само из тебя делает конфетку с идеальной кожей.
- Page 1 Blade V7 Lite User Manual... Page 2 About This Manual Thank you for choosing this ZTE cellular device. In order to keep your device in its best condition, please read this manual and keep it for future reference. Copyright Copyright © 2016 ZTE CORPORATION All rights reserved.
- Page 3 ® The Bluetooth trademark and logos are owned by the Bluetooth SIG, Inc. and any use of such trademarks by ZTE Corporation is under license. microSDHC Logo is a trademark of SD-3C, LLC. Other trademarks and trade names are the property of their respective owners.
- Page 5 Protecting Your Phone With Encryption ......32 Protecting Your Phone With Screen Pinning ...... 34 Knowing the Basics ..........36 Monitoring the Phone Status ..........36 Managing Notifications ............37 Managing Icons and Widgets ..........40 ... Page 6 Checking Voicemail ............73 Using Options During a Call ..........73 Managing Multi-party Calls ..........74 Adjusting Your Call Settings ..........76 Contacts ..............81 Checking Contact Details ..........81 Adding a New Contact ............81 ...
- Page 7 Opening the Messaging Screen ......... 97 Sending a Message ............97 Replying to a Message ............98 Forwarding a Message ............99 Copying a Message ............99 Changing Message Settings ..........99 Calendar ............... 100 ... Page 8 Opening Gallery .............. 114 Working With Albums ............114 Working With Pictures ............. 115 Retouching Your Pictures ..........116 Playing Videos ..............117 Music ..............118 Copying Music Files to Your Phone ......... 118 ...
- Page 9 Downloads ............... 132 File Manager ..............132 Mi-Moment ............... 133 Mirror Camera ..............133 ZTE Cares ............... 133 Google Apps ..............134 Google Play™ Store ..........136 Browsing and Searching for Apps ........136 ... Page 10 General Safety ..............159 Distraction ............... 160 Product Handling ............. 161 Electrical Safety ............... 165 Radio Frequency Interference ......... 166 Explosive Environments ..........167...
Page 11: Getting Started
Getting Started Getting to Know Your Phone 3.5mm Headset jack Proximity & Front flash light sensor Earpiece Front camera nano-SIM / microSDHC card Volume key slot Power key Touch screen Back key Menu Home key...
Page 12
Back flash Back camera Fingerprint sensor Speaker Microphone Charging/ micro-USB jack...
Page 13: Knowing The Keys
Knowing the Keys Function Press and hold to turn on or off airplane Power key mode, restart, power off, or switch sound mode. Press to turn off or on the screen display. Touch to return to the home screen from any Home key application or screen.- Page 15 1. Insert the tip of the tray eject tool into the hole on the nano-SIM / microSDHC card tray. 2. Pull out the nano-SIM card tray or microSDHC card tray and place the nano-SIM card or microSDHC card on the tray, as shown.
- Page 17 The battery can only be changed by ZTE or ZTE authorized service provider. 1. Connect the adapter to the charging jack. Ensure that the adapter is inserted with the correct orientation. Do not force the connector into the charging jack.
Page 19: Setting Up For The First Time
and hold the Power key for about 10 seconds to power off the phone. Setting Up for the First Time When you first power on your phone after you purchase it or reset it to factory settings (see on page 150), Backup &...- Page 21 To open the available options for an item (for example, a message or link in a web page), touch and hold the item. Swipe or Slide To swipe or slide means to quickly drag your finger vertically or horizontally across the screen. ... Page 22 before you start to move your finger. While dragging, do not release your finger until you have reached the target position. Pinch In some apps (such as Maps, Chrome, and Gallery), you can zoom in and out by placing two fingers on the screen at once and pinching them together (to zoom out) or spreading them apart (to zoom in).
Page 23: Getting To Know The Home Screen
orientation from portrait to landscape by turning the phone sideways. NOTE: The auto-rotate feature needs to be enabled for the screen orientation to automatically change. Touch the Home key, slide screen to touch Settings > Display > When device is rotated and select Rotate the contents of the screen.
Page 24
Status bar Widgets Folder App icon Primary app icons Extended Home Screen Panels Your home screen is extendable, providing more space for shortcuts, widgets, and more. Simply swipe left or right on the home screen to see the extended panels. You can add or remove home screen panels, or adjust their order.
- Page 25 and hold an empty area of the home screen to open the Widget panel. 2. Touch and hold an application icon on the home screen or a widget on the Widget panel and drag it to the right edge of the screen to create a new home screen panel and put the icon or widget on it.
Page 27: Changing Ringtone And Notification Sound
Changing Ringtone and Notification Sound You can customize the default incoming call ringtone and the default notification sound. 1. Touch the Home key, slide screen to touch Settings > Sound & notification. 2. Touch Phone ringtone or touch Default notification ringtone.Page 29: Applying New Wallpapers
Applying New Wallpapers You can set the wallpaper for the home screen and lock screen. To set the home screen wallpaper: 1. Touch the Menu key from the home screen. 2. Touch MiColor and select the color you like for the wallpaper. You can also touch PICK COLOR to open the camera and drag the white round button on the viewfinder screen to pick the color for the wallpaper.Page 31: Setting The Home Screen Transition Effect
Setting the Home Screen Transition Effect 1. Touch the Menu key from the home screen. 2. In the window that appears at the bottom, touch Effect. 3. Pick an effect and the phone will demonstrate how it works. Touch other effects until you find the favourite one. Protecting Your Phone With Screen Locks You can protect your phone by creating a screen lock.- Page 33 Charge the battery. ● Keep the phone connected to the charger. ● Schedule an hour or more for the encryption process: you ● must not interrupt it or you will lose some or all of your data. When you"re ready to turn on encryption: 1.
- Page 35 Unpin the Screen To unpin the screen and return to normal use, touch and hold the Back key. If you have asked for the unlock pattern, PIN or password before unpinning the screen, swipe up on the lock screen and draw the pattern or enter the PIN/password.
Page 37: Managing Notifications
Wired headset connected Managing Notifications Notification Icons The status bar at the top of the home screen provides notification icons on the left. Below are some of the icons you may see. New SMS Upcoming event New message(s) from New Wi-Fi network the Email app detected New message(s) from...- Page 39 NOTE: If you block notifications for an app, you may miss its important alerts and updates. The notifications of some apps cannot be blocked. Use Quick Settings The Quick Settings make it convenient to view or change the most common settings for your phone. Open the notification panel and drag the panel downwards to find the following Quick Settings on the screen.
- Page 41 3. Slide left or right to browse all available widgets. Touch and hold a widget and drag it to a home screen panel. NOTE: While holding the item, you can drag it to the right edge of the screen to create a new home screen panel and put the item on it. Move Icons or Widgets 1.
Page 43: Rearranging The Primary App Icons
folder. Rearranging the Primary App Icons The home screen includes a customizable primary icons area at the bottom visible from all home screen panels. You can keep at most five items in the area. Drag icons or folders in or out of the area to rearrange it.- Page 45 Touch the alphabetic keys to enter letters. Touch and hold some specific keys to enter associated accented letters or numbers. For example, to enter È, touch and hold the available accented letters and number 3 appear. Then slide to choose È. ...
- Page 47 The FULL layout offers an input experience similar to a computer keyboard. The alphabetic keys: Touch the keys to enter letters. Touch a key and slide down to enter the number or symbol on the key. You can also touch and hold a key and slide to choose more characters. Page 48 Touch an alphabetic key repeatedly until the desired letter appears. You can also touch and hold the key and slide left or right to choose the letter or number you need. If word prediction is enabled (long press), just touch the keys once and choose the right word.
Page 49: Google Voice Typing
Touch to enter the left letter on the key; double-tap or flick right to enter the right letter/symbol on the key. You can also touch and hold a key and slide left or right to choose more letters and symbols. If word prediction is enabled (long press), just touch the keys and choose the right word.Page 51: Opening And Switching Apps
Opening and Switching Apps Open an App Touch the Home key. Slide left or right on the screen and touch an app to open it. Switch Between Recently Opened Apps 1. Touch and hold the Menu key. The apps you’ve used recently are displayed in a series of tabs.- Page 53 Control Cellular Data Use To enable or disable data access: 1. Touch the Home key > Settings > SIM cards. 2. Touch the Cellular data switch to enable or disable cellular data use with that nano-SIM card. To get data services when roaming: 1.
- Page 55 Turn Wi-Fi On and Connect to a Wi-Fi Network 1. Touch the Home key, slide screen to touch Settings > Wi-Fi. 2. Slide the Wi-Fi switch to the On position to turn on Wi-Fi. 3. Touch a network name to connect to it. 4. Page 56 security details from the network"s administrator. Touch the Home key, slide screen to touch Settings > Wi-Fi. Slide the Wi-Fi switch to the On position. Touch the Menu key > Add network. Enter the network SSID (name). If necessary, enter security or other network configuration details.
- Page 57 The WPS PIN number displays on the screen. Enter the PIN number into the access point"s setup page. After entering the PIN number, your phone automatically finds the access point and configures the connection. NOTE: For detailed information about the WPS feature of the access point, please refer to its user documents.
Page 59: Change The Device Name
Phones or other devices with Bluetooth capabilities can exchange information wirelessly within a distance of about 10 meters (32.8 feet). The Bluetooth devices must be paired before the communication is performed. Turn Bluetooth On/Off Touch the Home key, slide screen to touch Settings > Bluetooth.Page 61: Connecting To Your Computer Via Usb
2. Select the option for sharing via Bluetooth. The method may vary by application and data type. 3. Touch a Bluetooth device the phone has paired with or wait for it to search for new devices and touch one of them. Receive Data via Bluetooth 1.
Page 62
Install driver: Install the driver needed for some USB connection modes (such as MTP). You only need to install the driver on the same PC once. NOTE: You can also install the driver on PC by running the executable file in the new CD-ROM drive. Connect to PC software: Install apps or manage data on ...
Page 63: Disconnect Your Phone From The Computer
and video files. Disconnect Your Phone From the Computer To disconnect the phone from the computer, simply unplug the USB cable when you’re finished. Remove the microSDHC Card From Your Phone If you need to remove the microSDHC card while the phone is on, you must unmount it first.- Page 65 you can configure your phone to share its cellular data connection with your computer. 1. Pair your phone with your computer via Bluetooth. 2. Configure your computer to obtain its network connection via Bluetooth. For more information, please see your computer"s documentation. Page 66 2. Slide the Wi-Fi hotspot switch to the On or Off position. After a moment, the phone starts broadcasting its Wi-Fi network name (SSID). 3. On another device, locate your phone via Wi-Fi and connect with it to start using the phone’s cellular data. NOTE: To stop sharing your data connection, switch off Wi-Fi hotspot.
Page 67: Connecting To Virtual Private Networks
Connecting to Virtual Private Networks Virtual private networks (VPNs) allow you to connect to the resources inside a secured local network. VPNs are commonly deployed by corporations, schools, and other institutions to let people access local network resources when not on campus, or when connected to a wireless network.
Page 68
When prompted, enter any requested credentials, and then touch CONNECT. Modify a VPN Touch the Home key, slide screen to touch Settings > More > VPN. Touch and hold the VPN that you want to modify. Touch Edit profile and edit the VPN settings you want. Touch SAVE.
Page 69: Phone Calls
Phone Calls You can place calls from the Phone app, the Contacts app, or other apps or widgets that display contact information. Wherever you see a phone number, you can usually touch it to dial. Placing and Ending Calls Place a Call by Dialing 1.Page 71: Working With The Call History
the call. You can also drag over to reject the call and select a preset text message or edit one to send to the caller. - or - If the screen is unlocked, touch DISMISS to reject the call. NOTE: To edit the preset text response from within the Phone app, touch in the top search field and select Settings >...
Page 72
Add a Number From Call History as a Contact Open the call history. Touch the contact icon in front of a listing. Touch on the contact information tab. To add the number to an existing contact, touch a contact in the list.
Page 73: Calling Your Contacts
Calling Your Contacts 1. Touch the Home key > . Your favourite contacts and frequently called contacts are displayed in the tab. 2. Touch a contact to place the call, or touch or swipe to the tab to view all your contacts and touch beside a contact to make a call.Page 75: Switch Between Current Calls
Switch between Current Calls When you’re on a call and another call comes in, your phone screen informs you and displays the caller ID. To respond to an incoming call while you’re on a call: Drag over to answer the call. (This puts the first caller on hold and answers the second call.) ...Page 77: Edit Quick Response To Rejected Callers
Edit Quick Response to Rejected Callers 1. Touch the Home key > (in the top search field) > > Settings > Quick responses. 2. Touch a text message to edit it. Set Voicemail 1. Touch the Home key > (in the top search field) > >...Page 79: Set Speed Dials
4. Set the restriction of specific types of calls from your phone. Forward Incoming Calls Call forwarding feature allows you to forward your incoming calls to another phone number. 1. Touch the Home key > (in the top search field) > >...
Page 80
2. Touch a nano-SIM card tab. 3. Touch Additional settings. 4. Touch Caller ID to choose whether your number is displayed when someone receives your outgoing call. Or check Call waiting to get notified of incoming calls during a call. NOTE: Please contact the service provider to check whether the caller ID and call waiting features are available.
Page 81: Contacts
Contacts You can add contacts on your phone and synchronize them with the contacts in your Google account or other accounts that support contact syncing. To see your contacts, touch the Home key > . From there, you can touch the tabs on the top of the screen to quickly switch to contact groups or favourite contacts.Page 83: Importing, Exporting, And Sharing Contacts
Importing, Exporting, and Sharing Contacts You can import/export contacts from/to your nano-SIM cards, the phone storage or the microSDHC card. This is especially useful when you need to transfer contacts between different devices. You can also quickly share contacts using Bluetooth, Google Drive, Email, Gmail or Messaging.
Page 84
4. Select the vCard file(s) and touch OK. Export Contacts to the nano-SIM Cards 1. Touch the Home key > 2. Touch > Import/Export > COPY CONTACTS FROM Phone contact. 3. Touch NEXT > COPY CONTACTS TO USIM1 / USIM2. 4.
Page 85: Working With Favourite Contacts
box appear. 3. Check the contacts you want to share and then touch the Menu key > Share. 4. Choose how to share the contacts. Options depend on the applications and services installed. Working With Favourite Contacts In the favourite contacts tab, you can find your favourite contacts and frequently contacted contacts.Page 87: Searching For A Contact
Touch to save the group. Delete a Group Touch the Home key > and touch the GROUPS tab. Touch a group and then touch the Menu key > Delete. Touch OK to disband the group. The contacts in the group will not be deleted.Page 89: Web Accounts
Web Accounts Adding or Removing Accounts You can add multiple Google accounts and Microsoft Exchange ® ActiveSync accounts. You may also add other kinds of accounts depending on the apps installed on your phone. Add an Account 1. Touch the Home key, slide screen to touch Settings > Accounts >...- Page 91 to sync. 3. Touch the Menu key > Sync now. Or touch the types of information you want to sync. Change an Account’s Sync Settings 1. Touch the Home key, slide screen to touch Settings > Accounts. 2. Touch the account category and then the account. The Sync screen appears, showing a list of information the account can sync.
Page 93: Responding To An Email
Responding to an Email You can reply to or forward a message that you receive. You can also delete messages and manage them in other ways. Reply to or Forward an Email 1. Open the email you want to reply to or forward from the Inbox. 2.Page 95: Adding And Editing Email Accounts
4. Touch > Attach file to add audio files, images, videos and other types of files as attachments. 5. Touch at the top right of the screen to send the message. Adding and Editing Email Accounts Add an Email Account After setting up your first email account (see Setting Up the on page 92), you can add more email...Page 97: Messaging
Messaging You can use Messaging to exchange text messages (SMS) and multimedia messages (MMS). Opening the Messaging Screen Touch the Home key > The Messaging screen opens, where you can create a new message, search for messages, or open an ongoing message thread.Page 99: Forwarding A Message
3. Touch Forwarding a Message 1. On the Messaging screen, touch the thread that has the message you want to forward. 2. Touch and hold the message and then touch Forward in the menu that opens. 3. Enter a recipient for the message and edit the content if you want.Page 101: Creating An Event
In Month view, swipe vertically to see previous and future months. In Week or Day view, swipe horizontally to see previous and future weeks/days. When you are viewing past or future days, weeks, or months, touch Today at the top to quickly switch to today. View Event Details In Agenda, Day, or Week view, touch an event to view its details.Page 103: Web Browser
Web Browser Use Browser to view web pages and search for information. Opening a Web Page Tap the address bar, enter the website you want to browse, and tap > Bookmarks. Tap a bookmark to open it. >...Page 105: Changing Browser Settings
④ Tap Edit bookmarks. ⑤ Edit the name or location, and then tap OK to save it. Deleting a Bookmark ① From the home screen, tap ② Tap > Bookmarks. ③ Tap and hold the bookmark you want to delete until the shortcut menu pops up.
Page 106
can sign in later via the Settings menu. ④ To enter a URL, tap the web address bar, enter an address. ⑤ Scroll to navigate and tap links to open them. Use a pinching gesture to zoom out. Spread your fingers apart to zoom in.
Page 107: Camera
Camera You can use your phone to take photos and record videos. Photos and videos are stored on the microSDHC card you have installed or in the phone storage. You can copy them to your computer or access them in the Gallery app. Capturing a Photo 1.
Page 108
Number Function Switch between the front and back cameras. Switch between Auto camera mode and Pro camera mode. In Pro camera mode (only available for the back camera), you can configure more options, such as gradienter, exposure, ISO, and white balance. Change the flash setting.
Page 109: Recording A Video
3. Touch the area where you want the camera to focus, or leave the camera to autofocus on the center of the image. 4. Lightly touch NOTE: You can touch and hold to take burst shots. Recording a Video You can record a normal-speed or slow motion video clip. 1.Page 111: Customizing Camera/camcorder Settings
Drag to any area on the screen that you want to focus Drag to any area on the screen where you want the camera to meter exposure so as to adjust the photo brightness. Touch to show the grids, spiral or off. ...
Page 112
Not all options are available for the front camera or the back camera. Camera options Picture size: Set the image size for your photo. Shot-timer: Set a time delay before the camera takes a picture automatically after you touch the shutter icon, or turn off this feature.
- Page 113 or take a picture. You can turn off this feature. Storage location: Change the storage location for captured photos and videos. Restore defaults: Restore default camera and camcorder settings.
Page 115: Working With Pictures
To delete albums, pictures, or videos: 1. Touch and hold an album to select it or touch and hold an item after you open an album to select a picture or a video. 2. Touch more items that you want to delete. 3.Page 117: Playing Videos
Gallery. The changed picture is saved in the same album as the original image, which is not affected. 1. Touch the Menu key > Edit while viewing a picture in full screen to open the Editor interface. NOTE: You can also choose to edit the picture with Photos. 2.Page 119: Viewing Your Music Library
Viewing Your Music Library Touch the Home key, slide screen to touch Entertainment > Music and your music library is displayed. All your audio files are cataloged according to the information stored in the files. Touch Artists/Albums to browse music files on your phone organized by the artist or album name.- Page 121 Number Function Return to the music library. Album artwork. Swipe left to see lyrics (if available) and right the current playlist. Track name, artist, and album information. Playback control: Skip songs or pause and resume playback. Drag the progress bar to jump to any part of the track.
Page 123: Video Player
Video Player Use the Video app to manage your video library and watch videos. Opening the Video Library Touch the Home key, slide screen to touch Entertainment > Video to view your video library, where your video files are displayed in a list. Swipe up or down to find the video you want.- Page 125 Trim a Video Clip 1. Touch a video to start playing it. 2. Touch the Menu key > Trim. 3. Drag the two tabs on the progress bar to select the portion you want to keep. If necessary, touch to preview the selected portion. 4.
Page 127: Recording Radio Programs
Slide up or down to view all favourite channels. Touch > Earphone to listen to the radio programs through the phone speaker. Recording Radio Programs When you listen to the radio, you can record your favourite programs and save the audio on the phone. 1.- Page 129 1. Touch at the top right of the screen to see all recordings. 2. Touch the title of a memo to play it. NOTE: You can also touch next to a memo to delete, rename, share, trim it, check its file information, add a tag, or set it as your phone ringtone.
Page 131: Clock
Clock Touch the Home key, slide screen to touch Clock. The Clock app allows you to check local time in places around the world, set alarms, and use timers. Set a New Alarm 1. Touch the tab in the Clock app. 2.Page 133: Mi-moment
Touch at the top right to open the Camera app. ZTE Cares Touch the Home key, slide screen to touch System Tools > ZTE Cares. You can use this app to access online after-sales support and search for service information.- Page 135 Hangouts: Chat with Google+ friends or send text or multimedia messages. Photos: Manage photos on the phone and your Google account. Play Store: Buy and download apps, games, and other content from the Google Play Store. Voice Search: Search for information with your voice.
Page 137: Creating A Google Wallet™ Account
CAUTION: Once installed, some apps can access many functions or a significant amount of your personal data. The Play Store will show you what the app can access. Touch ACCEPT to proceed, or touch the Back key to cancel. 2. Wait for the app to be downloaded and installed automatically.Page 139: Settings
Settings Touch the Home key, slide screen to touch Settings. The Settings app contains most of the tools for customizing and configuring your phone. Wireless and Networks Wi-Fi Touch the Home key, slide screen to touch Settings > Wi-Fi. You can turn Wi-Fi on or off and configure your Wi-Fi connections.Page 141: Device
Touch the Home key, slide screen to touch Settings > More > VPN to set up and connect to virtual private networks. See on page 67. Connecting to Virtual Private Networks Cellular Networks Touch the Home key, slide screen to touch Settings > More > Cellular networks to control cellular data use, set access point names, or select cellular network or network types.
Page 142
displayed as a screensaver. Font size: Set the font size of the text on the screen. When device is rotated: Select whether the screen contents should rotate when the phone is rotated. Sound & Notification Touch the Home key, slide screen to touch Settings > Sound &...
- Page 143 see apps installed on your phone and manage them. Touch an app in the list to see its information. You can stop the app, disable or enable it, uninstall it, clear its data, cache or defaults, or move it between the user ROM and the microSDHC card. Page 144 accessible from your computer. To view the internal storage space: Touch the Home key, slide screen to touch Settings > Storage & USB and scroll to the Device storage section. User ROM The user ROM is part of the internal storage where you can store your files.
Page 145: Personal
save battery life. For example, touch Screen > DISPLAY to change screen brightness and sleep. Touch the Menu key > Battery saver to manage battery saving mode, which reduces your phone’s performance and limits vibration, location services and most background data to improve battery life.
Page 146
To turn on this feature, slide the switch to the On position and check Screen wake-up. Location Touch the Home key, slide screen to touch Settings > Location to manage location services, which help your phone and apps determine your location. To use location-related applications, such as finding your location on Google Maps, you must have location services turned on on your phone.
- Page 147 Automatically lock: Set the time needed for the lock protection to be activated after the screen turns off. This option is available when unlock pattern, PIN or password is set. Power button instantly locks: Lock protection is activated immediately when you press the Power key. Page 148 allowed, your nano-SIM card will be locked and you cannot access the cellular phone network. Contact your operator for a PIN Unlock Key (PUK) to restore the nano-SIM card. Make passwords visible: Display passwords as you enter them. Device administrators: View or deactivate apps you have authorized to be device administrators.
- Page 149 Touch Add account to sign in to or create accounts on your phone. Touch an account type to see that type of accounts you have added and adjust the accounts settings. Language & Input Touch the Home key, slide screen to touch Settings > Language &... Page 150 text-to-speech output feature supports the current system language. Voice Control: Select and configure voice input services. Pointer speed: Select how fast the pointer/mouse should scroll when you connect the phone to a trackpad or mouse accessory. Backup & Reset Touch the Home key, slide screen to touch Settings >...
Page 151: System
System Date & Time Touch the Home key, slide screen to touch Settings > Date & time to set date, time, time zone, and the time format. You can also use network-provided data. Scheduled Power On/Off Touch the Home key, slide screen to touch Settings > Scheduled power on/off.Page 153: Upgrading The Phone Software
Use the upgrade package on your microSDHC card. NOTE: Visit the ZTE official handset service support website (http://www.ztedevice.com/support) and select your country or region to learn more about the above upgrade methods, as well as which phones and methods are supported.- Page 155 Problem Possible causes Possible solution End the call and dial The network link quality again. You may be is poor on the part of switched to a your service provider. better-quality network link or phone line. Echo or noise End the call and dial again. Page 156 Problem Possible causes Possible solution The standby time is related to your service provider system configuration. The same If you are located in an phone used with area where signaling is different service weak, temporarily power providers’ systems will off the phone. not provide exactly the same length of standby time.
- Page 157 Problem Possible causes Possible solution Cannot turn Battery power has been Recharge the phone’s your phone depleted. battery. The nano-SIM card Take the nano-SIM card malfunctions or is to your service provider damaged. for testing. nano-SIM The nano-SIM card is Insert the nano-SIM card error inserted improperly. Page 158 Problem Possible causes Possible solution Disable this feature. See You have activated the Cannot Bar Certain Calls Call barring feature. page 83. make outgoing You have activated the Disable this feature. See calls. Fixed dialling numbers Use Fixed Dialling feature. on page 82.
Page 159: For Your Safety
For Your Safety General Safety Don’t make or receive handheld calls while Don’t use at gas driving. Never text stations. while driving. Keep your phone at Your phone may least 10 mm away produce a bright or from your ear or body flashing light.Page 161: Product Handling
Operating Machinery Full attention must be given to operating the machinery in order to reduce the risk of an accident. Product Handling General Statement on Handling and Use You alone are responsible for how you use your phone and any consequences of the use.Page 163: Normal Use Position
Demagnetization To avoid the risk of demagnetization, do not allow electronic devices or magnetic media close to your phone for a long time. Electrostatic Discharge (ESD) Do not touch the metallic connectors of the nano-SIM card. Antenna Do not touch the antenna unnecessarily. Normal Use Position When placing or receiving a phone call, hold your phone to your ear, with the bottom toward your mouth.Page 165: Electrical Safety
headphones, Bluetooth headsets or other audio devices. Phone Heat Your phone may become warm during charging and during normal use. Electrical Safety Accessories Use only approved accessories. Do not connect with incompatible products or accessories. Take care not to touch metallic objects, such as coins or key rings, or allow them to contact or short-circuit the battery terminals.Page 167: Explosive Environments
may also consult your hearing aid manufacturer to discuss alternatives. Medical Equipment Switch off your wireless device when you are requested to do so in hospitals, clinics or health care facilities. These requests are designed to prevent possible interference with sensitive medical equipment.- Page 169 NOTE: This equipment has been tested and found to comply with the limits for a Class B digital device, pursuant to part 15 of the FCC Rules. These limits are designed to provide reasonable protection against harmful interference in a residential installation. This equipment generates, uses and can radiate radio frequency energy and, if not installed and used in accordance with the instructions, may cause harmful interference to radio... Page 170 The standards include a substantial safety margin designed to assure the safety of all persons regardless of age or health. FCC RF Exposure Information and Statement. The SAR limit of USA (FCC) is 1.6 W/kg averaged over one gram of tissue. The Device (FCC ID: SRQ-V6PLUS) has also been tested against this SAR limit.